In this post we will learn how we can modify an existing Google Spreadsheet worksheet. We will learn how we can rename the worksheet; add rows and column into it. To proceed with here is the screen shot of the EmpDetails spreadsheet we uploaded in our first post. The default name is Sheet1 and it has 4 columns and five rows into it.

We have following .NET interface which we are using in this series of learning Google Spreadsheet API. We have two buttons and one list view control on form. The "Pull Spreadsheet List" button has .NET code snippet which interacts with Google Doc by using Spreadsheet API and pull Spreadsheet list. The Spreadsheet list is shown in the list view control. We have second button called "Update Worksheet" on the .NET GUI. This button contains the .NET code logic which will apply the modification on Google Spreadsheet we have selected from the list.

To use Google Spreadsheet API, we have to add reference of Google Data API in our project and have to use following namespaces in the form.
using Google.GData;
using Google.GData.Client;
using Google.GData.Extensions;
using Google.GData.Spreadsheets;
We are using following form level variable in the code. This variable will store the Google Spreadsheet name.
public partial class Form1 : Form
    {
        string spreadsheetName;
The .NET code snippet on button "Pull SpreadSheet List" is following:
private void button1_Click(object sender, EventArgs e)
  {
   listView1.Columns.Add("SpreadSheet Name");
   listView1.Columns.Add("Summary");
   listView1.Columns.Add("Published Date");
   listView1.FullRowSelect = true;

   SpreadsheetsService GoogleExcelService;
   GoogleExcelService = new SpreadsheetsService("Spreadsheet-Vikash-Test-App");
   GoogleExcelService.setUserCredentials("gmailuserid", "Gmailpassword");

   SpreadsheetQuery query = new SpreadsheetQuery();
   SpreadsheetFeed myFeed = GoogleExcelService.Query(query);

   foreach (SpreadsheetEntry mySpread in myFeed.Entries)
   {
    listView1.Items.Add(new ListViewItem(new string[] { mySpread.Title.Text, mySpread.Summary.Text, mySpread.Updated.ToShortDateString() }));

   }

  }
The list view control displays the spreadsheet list, after selecting an individual spreadsheet from the list user can perform the modifications. We have following code snippet which stores the name of the spreadsheet we select from the list.
private void listView1_SelectedIndexChanged(object sender, EventArgs e)
{
 spreadsheetName = "";
 ListView.SelectedListViewItemCollection SpreadsheetList = listView1.SelectedItems;

 foreach (ListViewItem item in SpreadsheetList)
 {
 spreadsheetName = item.SubItems[0].Text.ToString();

 }
}
The code logic on button "Update Worksheet" is following. We are renaming the worksheet from Sheet1 to EmpDetails. We have modified the number of rows to 15 and columns to 8.
private void button3_Click(object sender, EventArgs e)
{
  if (spreadsheetName.Length > 0)
  {
  SpreadsheetsService GoogleExcelService;
  GoogleExcelService = new SpreadsheetsService("Spreadsheet-Vikash-Test-App");
  GoogleExcelService.setUserCredentials("gmailuserid", "Gmailpassword");

  SpreadsheetQuery query = new SpreadsheetQuery();
  SpreadsheetFeed myFeed = GoogleExcelService.Query(query);

  foreach (SpreadsheetEntry mySpread in myFeed.Entries)
  {
   if (mySpread.Title.Text == spreadsheetName)
   {
   WorksheetFeed wfeed = mySpread.Worksheets;
   foreach (WorksheetEntry wsheet in wfeed.Entries)
   {
    //Add new worksheet and some blank rows and columns
    wsheet.Title.Text = "EmpDetails";
    wsheet.Rows = 15;
    wsheet.Cols = 7;
    wsheet.Update();
   }
   }

  }
  System.Windows.Forms.MessageBox.Show("Worksheet updated Successfully");
  }
}
After setting up the code, the very first thing we need to do is to connect with the internet and run the form/program. I clicked on button "Pull SpreadSheet List" and the code logic runs successfully and pulled the entire Spreadsheets name into the list.
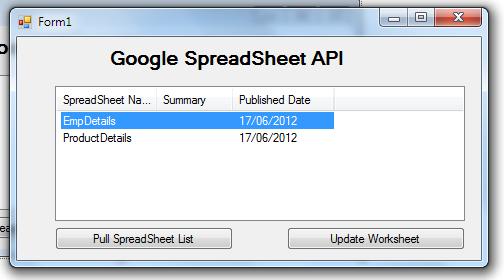
I selected the EmpDetails spreadsheet and clicked on button "Update Worksheet";. The code runs successfully and throws the message that Worksheet has been updated.

I log into my Google Doc account and open the spreadsheet. The modifications have been made to the Spreadsheet. The worksheet name has been changed. Rows have been added till 15 and columns till 8

So we have learn how we can modify an existing worksheet using Spreadsheet API. Thansk for reading till this point.


