Monday, December 31, 2012
Google App Script: JavaScripting on Cloud
Google App Script to get Stock Price in your inbox Every hour
Google App Script: How to read your Google Drive statistics?
Google App Script: How to set your personal assistant to send B'day wishes automatically?
Google App Script: How to pull all Google contacts in Google Spreadsheet?
Google App Script: How to read data from Google Spreadsheet?
Tuesday, December 25, 2012
How to download your EPF e-Passbook?
2. An active mobile number
3. An Identity card. Currently the Member portal accepts following identity cards:
a. PAN Number
b. AADHAR(UID) number
c. National Population Registration number
d. Bank Account number
e. Voter ID card
f. Driving License
g. Passport number
h. Ration Card number


You need to select your State and Region name from the screen page.

The next thing is you need to provide your Provident fund account number and name as it appears on your PF slip and click on Get PIN.

You will again received a message with a PIN number on your mobile from Member portal . Once you received the PIN, you need to enter the Pin number and click on submit button. If your e-Passbook is not read with the Member Portal you will receive a message to sent request to get your e-Passbook.You need to click on the button.

Member portal will send the request to your Provident Fund office and it will inform you on the mobile when your passbook is available. In my case it took two weeks and I received SMS that my e-Passbook is available.

Related Articles:
Know Your EPF Balance via SMS
EPF SMS: How to read and interpret it correctly?
Monday, December 24, 2012
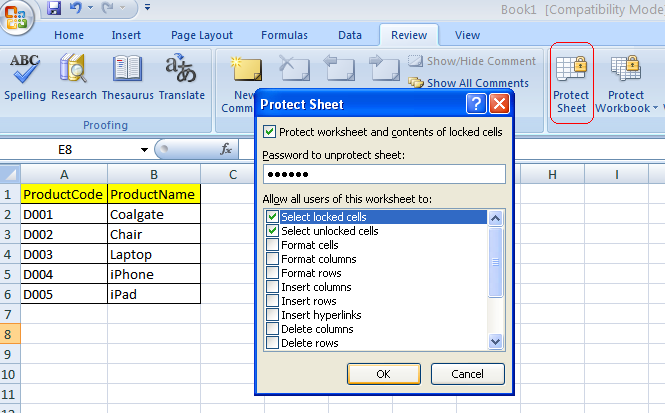
SSIS: How to read password protected Ms-Excel files?
- Protection at Sheet level
- Protection at Workbook level

- SSIS: How to load multiple excel files into multiple SQL tables?
- SSIS: How to loop through Multiple Excel sheets and load them into a SQL Table?
- SSIS: How to resolve Excel Import 255 character Truncation issue?
- SSIS: Read and Export Excel data from nth Row
- SSIS: How to generate HyperLink in Excel output?


Saturday, November 10, 2012
SSIS: How to loop through Multiple Excel sheets and load them into a SQL Table?
Microsoft Excel spreadsheet is use by many individuals and organization, business to store data and perform calculation on this data. Reading and Writing data into Ms-Excel using SSIS is very common. Ms-Excel spreadsheet can store data into multiple sheets. Reading data from these sheets and storing it into a SQL table is pretty easy with SSIS. In this post we will learn to read data from multiple sheets and store it into a SQL table.
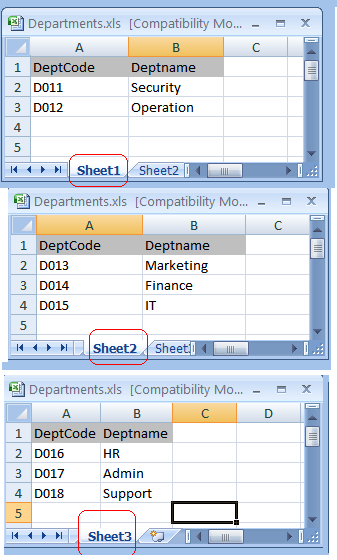
For demonstration purpose let us consider following Ms-Excel spreadsheet with data in three different sheets. Each sheet contains two colum data - DeptCode and Deptname.
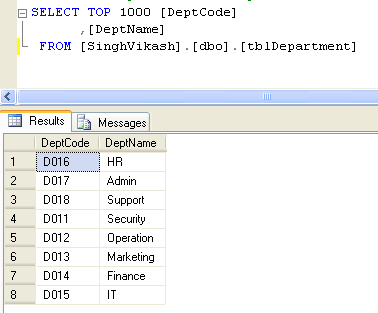
Let us create a SQL table which will store the data from all three sheets of Ms-Excel.
CREATE TABLE [dbo].[tblDepartment](
    [DeptCode] [varchar](50) NOT NULL,
    [DeptName] [varchar](50) NOT NULL
) ON [PRIMARY]
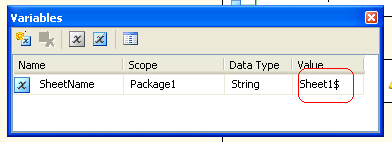
Let us create the SSIS package now. The very first thing we did is to create a variable with the name “SheetName”. The default value in this variable is name of first sheet i.e. Sheet1$.
In the control flow tab we have added two tasks – one Foreach Loop Container and one Data Flow Task.
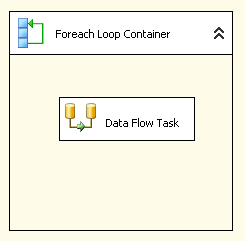
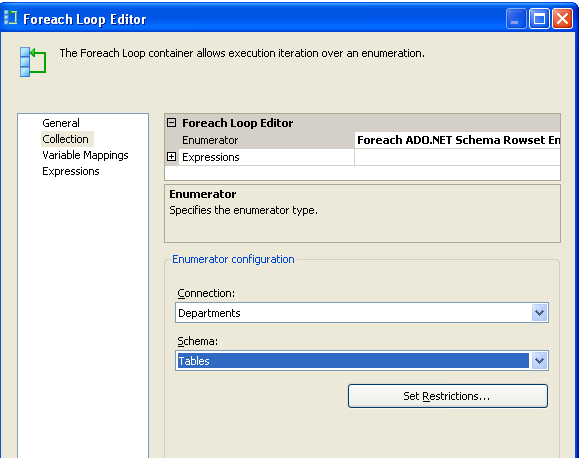
Foreach Loop Container will loop through each of sheet and perform Data Flow Task activities. On Foreach Loop container editor dialog box we have selected Foreach ADO.NET Schema Rowset Enumerator and in Connection we have selected New Connection.
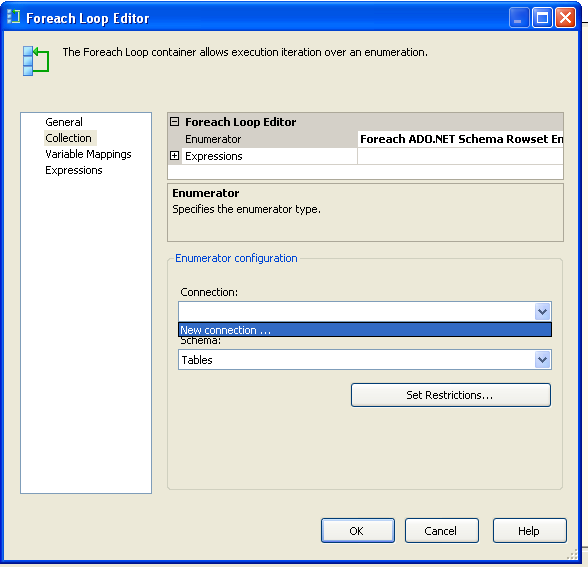
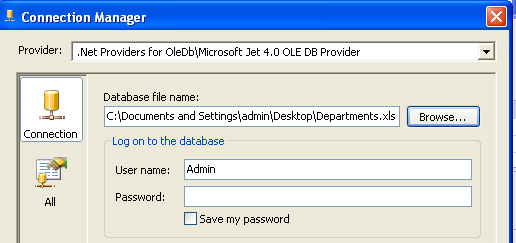
From the Connection Manager list we have selected Microsoft Jet 4.0 OLE DB Provider.

We have selected the Ms-Excel spreadsheet as Database file name
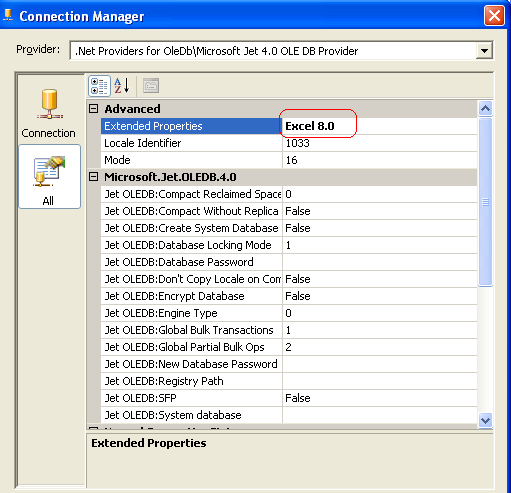
From the All properties tab we have setup Extended Properties value to Excel 8.0
From the Schema list we have selected Tables.
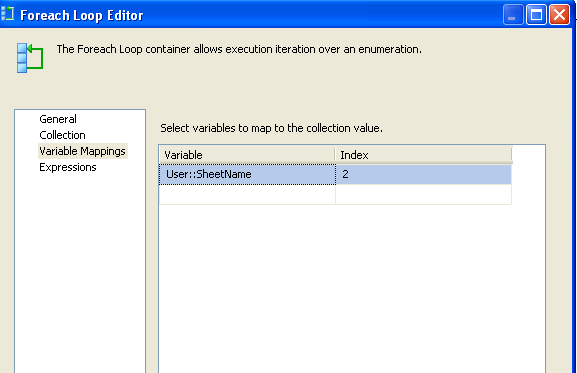
From the Variable Mappings tab we have setup the variable mapping with user defined variable "SheetName" to index 2.
On Data Flow Tab we have following three controls.
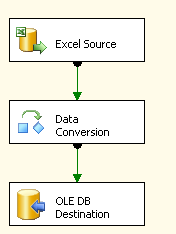
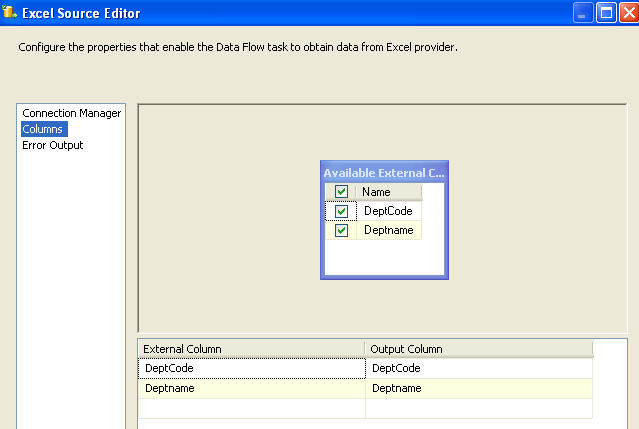
Excel Source controls read the data from each of the sheet. On Excel Source we have setup the Data access mode to Table name or view name variable. We have selected the variable name as SheetName, we have defined this variable earlier.

From the Columns we have selected the two output columns – Deptcode and DeptName.
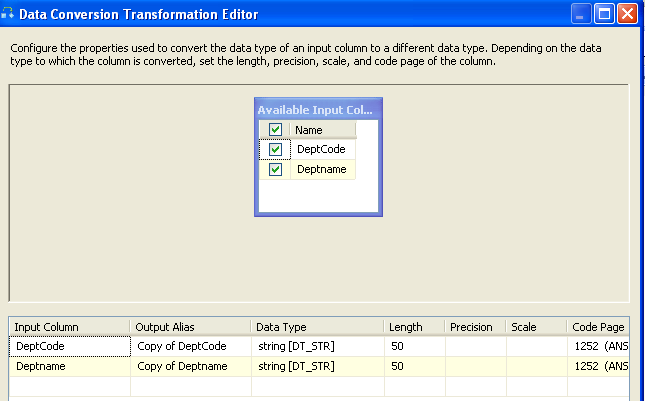
Data Conversion control convert the data type from Unicode to Varchar as the data we read from Excel is treated as Unicode.
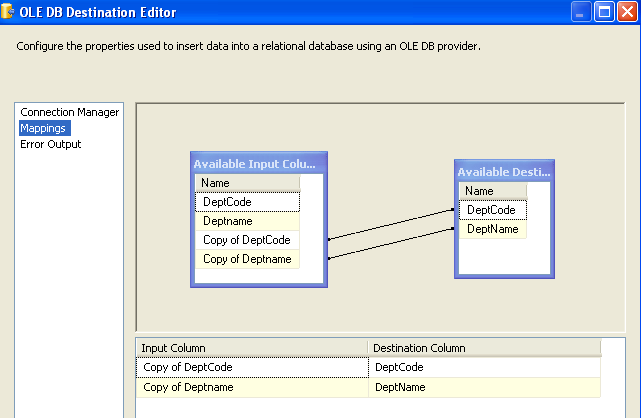
OLE DB Destination controls load the data into SQL table. We have mapped the derived columns with SQL table.
After setting up the SSIS package, I run the SSIS pacage and it runs successfully,

I checked the SQL table and all data from all the sheets were loaded successfully.
Sunday, October 28, 2012
Google Picasa Web API
How to pull thumbnail of all photos from Picasa web Album?
Picasa Album is a great service provided by Google to store and share online images. There are many plug-in and interfaces available to access images stored in Picasa web album. These images can be accessed from many devices such as cellphone, iPhone, tablets, web applications, desktop applications and many more.
Google has provided Google Data API which can be used by developer community to develop applications and integrate it with Picasa web album. Developers need to first download the Google Data API library to interact with Google services such as Picasa web albums, Google Docs, Google BigQuery, YouTube and other Google provided services.
On this site, I have published articles on using Google Data API with .NET and accessing Google services such as Picasa web Albums, Google Analytics, Google Spreadsheet, Google BigQuery. This article is another extension to the same set of articles.
In this post we will learn to pull thumbnails of all photos stored in a particular Picasa web album using .NET. First we will interact with Google services by providing our Google credentials and then pull the albums stored with the specific Google account. We will then pull the thumbnails of all images stored in a specific web album
To start with, I have designed following form in Visual Studio 2008. The form has two text boxes to enter Google credentials i.e. Google account and password. The login button has code logic to connect to Google Picasa service by supplying the Google credentials entered into the two text boxes.

Get Album List button has code logic to pull all albums name and id stored with the Google account. The lists of Albums are shown in ListView1 control


ListView1 control has an event SelectedIndexChanged which contains the code logic to access all the images stored in the selected web album. Each of the image is than loaded into ImageList1 control. Once all the images are read and added into ImageList1, the thumbnail of all images are shown in ListView2 control.
Showing thumbnail of all images stored web album "Harshita".

Showing thumbnail of all images stored in web album "Canada.Halifax.2010"

The code snippet on this form is following:
using System;
using System.Collections.Generic;
using System.ComponentModel;
using System.Data;
using System.Drawing;
using System.Linq;
using System.Text;
using System.Windows.Forms;
using Google.GData.Client;

using Google.GData.Photos;
using Google.GData.Extensions;
using Google.GData.Extensions.Location;
using Google.Picasa;
using System.IO;

namespace TestDOTNET
{
    public partial class Form1 : Form
    {
        String myAlbumID;
        PicasaService myPicasa;
        AlbumQuery myAlbumQuery;
        PicasaFeed myPicasaFeed;

        public Form1()
        {
            InitializeComponent();
        }

        private void button1_Click(object sender, EventArgs e)
        {
            //Code logic to connect with Google Picasaservice with the supplied credentials
            myPicasa = new PicasaService("Vikash-Test-Picasa");
            myPicasa.setUserCredentials(textBox1.Text, textBox2.Text);
            label3.Text = "Click on Get Album List";
        }

        private void button2_Click(object sender, EventArgs e)
        {
            //Code logic to pull Album names and ID
            listView1.Columns.Add("Album Title");
            listView1.Columns.Add("Album ID");
            listView1.FullRowSelect = true;

            myAlbumQuery = new AlbumQuery(PicasaQuery.CreatePicasaUri(textBox1.Text));
            myAlbumQuery.KindParameter = "album";

            myPicasaFeed = myPicasa.Query(myAlbumQuery);
            foreach (PicasaEntry p in myPicasaFeed.Entries)
            {

                AlbumAccessor myAlbum = new AlbumAccessor(p);
                listView1.Items.Add((new ListViewItem(new string[] { myAlbum.AlbumTitle.ToString(), myAlbum.Id.ToString() })));
            }


        }

        private void listView1_SelectedIndexChanged(object sender, EventArgs e)
        {
            //Code logic to pull all thumbnails of selected web album
            myAlbumID = "";
            imageList1.Images.Clear();
            listView2.Clear();
            ListView.SelectedListViewItemCollection AlbumList = listView1.SelectedItems;

            foreach (ListViewItem item in AlbumList)
            {
                myAlbumID = item.SubItems[1].Text.ToString();

            }

            if (myAlbumID.Length > 0)
            {
                PhotoQuery myPhotoQuery = new PhotoQuery(PicasaQuery.CreatePicasaUri(textBox1.Text, myAlbumID));

                PicasaFeed myPicasaFeed = myPicasa.Query(myPhotoQuery);
                foreach (PicasaEntry p in myPicasaFeed.Entries)
                {
                    string firstThumbUrl = p.Media.Thumbnails[0].Attributes["url"] as string;
                    imageList1.Images.Add(LoadMyImage(firstThumbUrl));
                }
                listView2.SmallImageList = imageList1;

                listView2.View = View.LargeIcon;
                this.imageList1.ImageSize = new Size(32, 32);
                listView2.LargeImageList = this.imageList1;

                for (int j = 0; j < this.imageList1.Images.Count; j++)
                {
                    ListViewItem item = new ListViewItem();
                    item.ImageIndex = j;
                    listView2.Items.Add(item);
                }
            }
        }

        private Image LoadMyImage(string url)
        {
            //Code logic to download all thumbnails of images
            System.Net.WebRequest request = System.Net.WebRequest.Create(url);

            System.Net.WebResponse response = request.GetResponse();
            System.IO.Stream responseStream = response.GetResponseStream();

            Bitmap bmp = new Bitmap(responseStream);

            responseStream.Dispose();

            return bmp;
        }

    }
}
So this is how you can download the thumbnails of all images stored in a Picasa web album. Just in case you want to download the source code please visit the Download Zone.
Saturday, October 27, 2012
SSIS: How to export Ms-Excel data into PDF?
Today while exploring SSIS, I learn a very good feature of exporting Ms-Excel data to PDF. In case our requirement is to print the Ms-Excel data into PDF and mail it to someone SSIS provides very good feature with Script Task.
For demonstration purpose let us consider we have following Ms-Excel file. We will export this excel file into PDF.

- SSIS: How to load multiple excel files into multiple SQL tables?
- SSIS: How to loop through Multiple Excel sheets and load them into a SQL Table?
- SSIS: How to resolve Excel Import 255 character Truncation issue?
- SSIS: Read and Export Excel data from nth Row
- SSIS: How to generate HyperLink in Excel output?
In SSIS designer, I have added one Script Task.
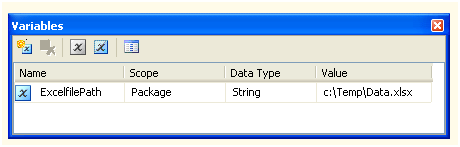
I have added one Package level variable with data type as string and store the Ms-Excel file path and file name into it.
In Script Task, I have added following VB.NET code to export the Ms-Excel file to PDF. In this code snippet, I am using reference of Microsoft.Office.Interop.Excel
The code snippet in Script Task is following:
Imports System
Imports System.Data
Imports System.Math
Imports Microsoft.SqlServer.Dts.Runtime
Imports Excel = Microsoft.Office.Interop.Excel

<System.AddIn.AddIn("ScriptMain", Version:="1.0", Publisher:="", Description:="")> _
<System.CLSCompliantAttribute(False)> _
Partial Public Class ScriptMain
    Inherits Microsoft.SqlServer.Dts.Tasks.ScriptTask.VSTARTScriptObjectModelBase

    Enum ScriptResults
        Success = Microsoft.SqlServer.Dts.Runtime.DTSExecResult.Success
        Failure = Microsoft.SqlServer.Dts.Runtime.DTSExecResult.Failure
    End Enum


    Public Sub Main()

        Dim myExcelApp As New Excel.Application
        Dim myExcelWb As Excel.Workbook
        myExcelWb = myExcelApp.Workbooks.Open(Dts.Variables("ExcelfilePath").Value, , True)
        myExcelWb.ExportAsFixedFormat(Excel.XlFixedFormatType.xlTypePDF, Dts.Variables("ExcelfilePath").Value)
        myExcelWb.Close()
        myExcelApp.Quit()

        Dts.TaskResult = ScriptResults.Success
    End Sub

End Class
After running the SSIS package, the SSIS package runs successfully and it exported the data into PDF.

So just in case you requirement is to export Ms-Excel data into PDF, you can achieve this without using any third part tool.
Friday, October 26, 2012
How to Run SSIS Package programmatically using Web Applications?
SSIS packages can be run from many platforms. SQL Server Agent, BIDS designer, Scheduler Jobs are the most used and familiar platforms. There are other platform that we can use to run SSIS packages such as Ms-Excel, .NET windows form, web application, WPF applications and web services. In one of the previous post, I had written about how to run SSIS package from Ms-Excel. In this post we will learn how to run SSIS package using web application.
For demonstration purpose, I have created a sample SSIS package. This SSIS package loads data from employee table to newEmployee SQL Table. We have following data into tblEmployee.

- SSIS: Read public data of Twitter Users?
- SSIS: How to pull Tweets from Twitter?
- SSIS: How to pull Currency Rates from European Central Bank
- SSIS: How to pull Stock Quotes from Google Finance
- SSIS: How to load data into SQL table from Google Spreadsheet?
- SSIS: How to Download images from Picasa album?
- SSIS: How to Load images into Picasa web album?
Execute SQL Task truncates all the rows from the newEmployee table. The Data Flow task reads all the data from OLE DB Source (employee table) and dumps it into OLE DB Destination (newEmployee table).

This package runs fine inside BIDS designer. We will try to run this package programmatically using a .NET based web application.
Microsoft has provided a Dynamic Link Library (DLL) Microsoft.SqlServer.Dts.Runtime that we can use to run our SSIS package from .NET environment. For demonstration purpose, I have created a web application and added a form in Visual Studio 2008. I have added a button and one label on the web form. The label will show the result status of the SSIS package execution.

I have added reference of Microsoft.SqlServer.Dts.Runtime dll into project. This form contains following code logic.
using System;
using System.Collections;
using System.Configuration;
using System.Data;
using System.Linq;
using System.Web;
using System.Web.Security;
using System.Web.UI;
using System.Web.UI.HtmlControls;
using System.Web.UI.WebControls;
using System.Web.UI.WebControls.WebParts;
using System.Xml.Linq;
using Microsoft.SqlServer.Dts.Runtime;

namespace WebApplication1
{
    public partial class _Default : System.Web.UI.Page
    {
        protected void Button1_Click(object sender, EventArgs e)
        {
            string strpackageName;
            Package SSISpkg;
            Microsoft.SqlServer.Dts.Runtime.Application Myapp;
            DTSExecResult dtresult;
            strpackageName = @"E:\DOTNET\Employees\Employees\Package.dtsx";
            Myapp = new Microsoft.SqlServer.Dts.Runtime.Application();
            SSISpkg = Myapp.LoadPackage(strpackageName, null);
            dtresult = SSISpkg.Execute();
            Label1.Text = "Result for SSIS Pacage Execution is " + dtresult.ToString();
        }

    }
}
After setting up the code with Visual Stuio web application. I run the web application and clicked on RUN SSIS Package button. The package executed successfully and showed the rest status as Success in the label.

I went to check my newEmployee table and as expected the data were loaded into the table.

The above example can be used if our SSIS package has been stored locally in a file system. If your SSIS package is stored in a remote location or file and print server, you can use that path, the only thing you need to consider is your web application hosted machine can access that file path. The account that is running the web application under IIS has access to the file system path.
Tuesday, October 23, 2012
Google Picasa Web API
How to pull Album data size from Picasa web Albums?
On this site I have published many post on how to use Google Picasa web API with .NET. This article is another extension to the set of articles on Picasa Web API with .NET.
All of us love to share or store our favourite pictures on various Social Media sites. Google Picasa Web is one of the popular media to store photos online. With each photo that we stored in Picasa web album, we consumed some space. Over the time as we add more and more photos to our web album, the album size is grown.
With .NET if your requirement is to pull each of the web album data size, you can use Google Data API and read this information. In this article we will learn how we can pull the data size of each Picasa web album using .NET.
The prerequiste for this is you must have Google Data API installed on your sytem and you can use any of your visual studio IDE 2005/2008/20010 or 2012. You also need an active Internet connection as you will be pulling online information.
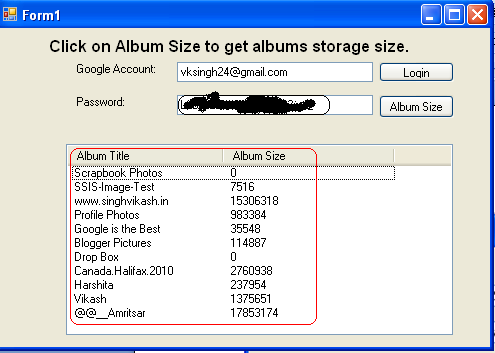
For demonstration purpose I have created following form in Visual Studio 2008.

I have two text boxes to take Google credentials as input. Once the use enter their Google credentials, they need to click on Login. The code logic written on Login button create an instance of Picasa web service and pass on the credentials to Picasa web service. If the Google credentials are correct a message appears on the form to ask user to clikc on Album Size.

Once the user click on Album Size button the code logic written on this button pulls all the web albums and their respective data size . The album name and their size will be shown in the list box. Google Picasa feed provides data size in bytes. So if you need to convert the data size from bytes to Megabytes or Gigabytes you can do it.
The .NET code logic on this form is following:
using System;
using System.Collections.Generic;
using System.ComponentModel;
using System.Data;
using System.Drawing;
using System.Linq;
using System.Text;
using System.Windows.Forms;
using Google.GData.Client;

using Google.GData.Photos;
using Google.GData.Extensions;
using Google.GData.Extensions.Location;
using Google.Picasa;
using System.IO;

namespace TestDOTNET
{
    public partial class Form1 : Form
    {
        String myAlbumID;
        PicasaService myPicasa;
        AlbumQuery myAlbumQuery;
        PicasaFeed myPicasaFeed;

        public Form1()
        {
            InitializeComponent();
        }

        private void button1_Click(object sender, EventArgs e)
        {


            myPicasa = new PicasaService("Vikash-Test-Picasa");
            myPicasa.setUserCredentials(textBox1.Text, textBox2.Text);
            label3.Text = "Click on Album Size to get albums storage size.";
        }

        private void button2_Click(object sender, EventArgs e)
        {
            listView1.Columns.Add("Album Title");
            listView1.Columns.Add("Album Size");

            listView1.FullRowSelect = true;


            myAlbumQuery = new AlbumQuery(PicasaQuery.CreatePicasaUri(textBox1.Text));
            myAlbumQuery.KindParameter = "album";


            myPicasaFeed = myPicasa.Query(myAlbumQuery);
            foreach (PicasaEntry p in myPicasaFeed.Entries)
            {

                AlbumAccessor myAlbum = new AlbumAccessor(p);
                listView1.Items.Add((new ListViewItem(new string[] { myAlbum.AlbumTitle.ToString(), myAlbum.BytesUsed.ToString() })));
            }


        }
    }
}
Popular Posts
-
 Mobile Payment is combination of technologies. These technologies include Mobile Wallet providers, Mobile Technology providers, Banking, So...
 -
3 Free Online Tools to learn and Experiment with MongoDB MongoDB Basics What is MongoDB? How to get Started with MongoDB How...
-
What is PEGA? What is New in PEGA 7? What is BPM? How to setup PEGA PRPC system in your local machine What are WorkType an...
-
GMail Tips How to create an archive copy of all your email or selected Gmail labels? How to check your Gmail account was hack...
-
YouTube API with .NET How to get started with YouTube API? How to pull top rated videos list from YouTube? How to pull region/coun...
-
SSIS: How to extract/unzip files to a folder using 7-Zip? SSIS: How to run command Line program and pass arguments to it? ...
-
What is Big Data? What is Hadoop? What is HDFS? What is Rack in Hadoop Cluster? Big Data: Tools and Technologies
