Wednesday, May 30, 2012

SSIS: How to Download images from Picasa album?

Picasa, the Google's offering of sharing, uploading and downloading images has many methods/plug-in available to upload and download images. In this post, we will learn how we can down load images from Picasa web album to our local folder through SSIS.

To start with, I have following images available in my Picasa web album "SSIS-Image-Test". We will download these images to our local folder.

Before we get our hand to SSIS we need to ensure that we have Google account, internet connectivity and we have installed the Google Data API client library for .NET.

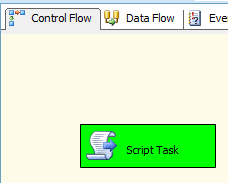
In SSIS package at control flow; I have one component Script Task. Script task contains the .NET code logic to download the images from Picasa web album.

I have added references of Google Data API DLLs and using following name space in the script task.

using Google.GData.Client;
using Google.GData.Photos;
using Google.GData.Extensions;
using Google.GData.Extensions.Location;
using Google.Picasa;
using System.Net;

The .NET code snippet for Main function() in Script Task is following:

public void Main()
        {
 string filename;
//Download all images to this path.       
 filename="C:\\006.  Temp\\Image\\SSISImage\\DownloadImage\\";

 PicasaService myPicasa = new PicasaService("Vikash-Test-Picasa");
//Pass userid and password as the credentials
 myPicasa.setUserCredentials("abc@gmail.com", "abcpassword");

 PhotoQuery myPhotoQuery = new PhotoQuery(PicasaQuery.CreatePicasaUri("abc", "5746268939336053009"));
 PicasaFeed myPicasaFeed = myPicasa.Query(myPhotoQuery);

 foreach (PicasaEntry p in myPicasaFeed.Entries)
 {
//Create the Webclient and download file
    WebClient wc = new WebClient();
    wc.DownloadFile(p.Content.Src.ToString(),filename + p.Title.Text);
                   
    Dts.TaskResult = (int)ScriptResults.Success;
}

After setting up the code, I run the package and package completed successfully.

I checked my local folder and all images were successfully downloaded into folder.

So our objective to download images from Picasa web album is achived.

Thanks for reading this post

If you wan to explore more on Picasa with .NET; please visit Google API Series in .NET

Related Article:

Sunday, May 27, 2012

SSIS: How to Load images into Picasa web album?

Picasa is an online repository for storing, editing and sharing images. There are many methods available to upload or download images from Picasa web album. In this post we will learn how we can load images from our local folder to Picasa web album through SSIS.

The very first thing we need to do is to follow the prerequisite we need to start with Picasa web services. We need a Google account to start with. We also need to download and install Google Data API library. Google Data API library is available in different platform (PHP, Python, .NET, Java, Javascript etc). Since SSIS supports .NET so all we need to do is to go to http://code.google.com/p/google-gdata/downloads/list and download Google Data API setup.

Once you have downloaded and installed the API setup the next thing we need to do is the drop the DLLS to GAC. For this we need to run Visual Studio Command Prompt as an Administrator and add following DLLS to Global cache.

Google.GData.Photos.DLL
Google.GData.Client.DLL
Google.GData.Extensions.DLL

After doing the setup and dropping of DLL the next thing, I did was to log into Picasa web account and created an album SSIS-Image-Test

The next thing, I did was to get AlbumID of the newly created web Album. For this I clicked on the RSS link of the web album.

Clicking on RSS will show the XML Feed and we can read the AlbumID from the XML Feed.

I have following images in my local folder which we will upload to Picasa web album (SSIS-Image-Test).

So we are all set to start with our package. In SSIS at control flow, I have two components: a ForEach loop container and a Script Task.

I am using the Foreach File Enumerator and Folder configuration is pointed to my local folder.

I am using following variable to store each of the file item location from Foreach file numerator

In the Script Task component, I have added reference of Google Data API DLLs. Script Task will run for each of the file stored in the local folder. I am importing following namespace in the Script Task code.

using Google.GData.Photos;
using Google.GData.Extensions;
using Google.GData.Extensions.Location;
using Google.Picasa;
using System.IO;

The .NET Conde snippt in Script Task is following:

public void Main()
  {
  //Create new Picasa Service
  PicasaService myPicasa = new PicasaService("Vikash-Test-Picasa");
  myPicasa.setUserCredentials("abc@gmail.com", "abcpassword");

//Create new URI by passing userid and AlbumID
  Uri newURI = new Uri(PicasaQuery.CreatePicasaUri("abc", "5746268939336053009"));

//Upload all images to Picasa
 
  System.IO.FileInfo newFile = new System.IO.FileInfo(Dts.Variables["ImageFile"].Value.ToString());
  System.IO.FileStream neFStream = newFile.OpenRead();
  PicasaEntry newEntry = (PicasaEntry)myPicasa.Insert(newURI, neFStream, "Image/jpeg", "Test");
  neFStream.Close();
  Dts.TaskResult = (int)ScriptResults.Success;
  }

After setting up the Script Task code I connected with the internet and run the SSIS package.

The SSIS package execution result shows that it run successfully. I log into my Picasa web account and navigated to the album SSIS-Image-Test. The image files were loaded successfully.

So our objective to load images into Picasa web album is achived.

Thanks for reading this post.

If you wan to explore more on Picasa with .NET; please visit Google API Series in .NET

Related Article:

Saturday, May 26, 2012

SSIS: How to resolve Excel Import 255 character Truncation issue?

You might have seen this topic headline (Excel import issue) discussed in many forums, blogs etc. This issue puts a serious limitation to Ms-Excel to be used as a data source. In this post we are going to see conceptually; why the experts are saying so? I recently learnt this and putting it here so that other people can learn.

Let us take an example – we have following data in Ms-Excel spreadsheet. We have 8 rows (from Row # 2 to Row # 9). We have three columns - EmpName, EmpComments and ColumnLength. The ColumnLength field contains the length of characters in field EmpComments. The highest number of character length is in Row #9 – 686.

I created a SQL table which will store the data exported from above Ms-Excel spreadsheet.

CREATE TABLE [dbo].[Employee](
    [EmpName] [varchar](50) NULL,
    [EmpComment] [varchar](1000) NULL
)

The table has two columns as my intention is to export only two columns – EmpName and EmpComment.

I build up a SSIS package with two connection manager – Excel Connection manager which points to our Ms-Excel spreadsheet and one OLE DB Connection which points to our SQL Server database.

In the package we have a Data Flow Task. Under Data Flow tab; we have three components. The first component is Excel Source which reads the rows from Ms-Excel Spreadsheet. The Derived Column component simply converts the columns EmpName and EmpComment data type from Unicode to String. The OLE DB Destination component is to load the values it received from Derived Column to table Employee under SQL Server database.

The derived column converts the unicode valaues to string as our data type in SQL table is varchar.

After setting up the SSIS package, I pressed the run button and it runs smoothly. All 8 rows were exported to SQL table.

Till this point all went fine for us. Now let us try to repeat the same scenario with 9 records (from Row # 2 to Row # 10). We have added a new Row at Row #9.

After setting the Ms-Excel Spreadsheet with 9 rows, I tried to run the SSIS package and this time it failed.

The Progress tab reported that there is a Truncation error at column EmpComments. Why? We did not change anything except adding a new row in our source spreadsheet.

If you handle the truncation error in your SSIS package it will insert only 255 characters in columns and truncate rest of the characters (EmpComments in our case).

The reason for this is that Ms-Excel connection manager actually works on a guess. Yes, that is right it works on the assumptions. It reads a registry key called "TypeGuessRows". The default value for this registry key is 8. This mean excel will scan the first 8 row to determine the data type and data length of the column.

The valid value for the key “TypeGuessRows” can be between 0 to 16. Setting the value to 0 tell Ms-Excel to scan all the rows before determining the data length and data type of column. This will cause a small performance hit especially if the data volume is large.

So in our first scenario all went fine, the Ms-Excel scanned the 8 rows and determined that the length of the column Empcomments would be equal to at least 686 characters.

In our second example, we inserted a row in between and as you can see the first 8 rows has maximum 77 characters length in column EmpComments. The 9th row has 686 characters length so the Package failed to insert and return truncation error.

So what is the solution? All we need to tell Ms-Excel is to scan some more rows before assuming the data type and data length of the columns. Right?

Yes, that is exactly what we have to do. I went to the registry and changed the value to 0. When the TypeGuessRows values become 0 it scans the 16,384 rows before assuming the data type and data length of the column.

After changing the TypeGuessRows values the SSIS package executed successfully. All 9 rows were imported from Ms-Excel spreadsheet.

So in a nutshell, if your data volume is extremely large and you are not sure about the position of rows with maximum length characters in the spreadsheet; the Ms-Excel may fail to achieve the purpose. It will fail or truncate the data. The solution is to use dump your data into a text file and use the text file instead as source of your data load.

I hope you like the post.
Please feel free to add comment to make this post more usable.

Related Article:

Wednesday, May 23, 2012

Google Data API Series with .NET

This post is last in series of our learning to use Google Data API with Picasa web Album. We have learnt quite a few things about Google Data API and how to use it to externally access Google Picasa services.

In summary all I have to say is this was good experience towards learning Google Data API. I learn and I hope that people who have reading this series of article might have learn or refresh their knowledge on Google Data API.

All you need to start with Google Data API is to download the Google Data API library and install it on your system. You should have a google account to access google services.

After writing these posts the diagram which comes to my mind towards learning Picasa web services is following:

Every time you need to access Picasa web services; you start with creating a Picasa Service and pass on the user credentials i.e. Gmail user id. To query Album you create Album Query and for photo you create photo query. You pass on AlbumID to URI Query if you are accessing a particular Picasa web album. The Album Query or Photo Query or URI Query is than handed over to Picasa feed which connects with the Picasa Web Service feed and returns the Picasa entry. The Picasa entry is a collection and it returns album or photo that you can access individually.

To sum up we learn following things in this series.

How to download images from Picasa web Album with Google Data API?
How to pull Album ID from Picasa Web Album with Google Data API?
How to upload multiple images to Picasa Web Album with Google Data API?
How to delete image from Picasa Web Album with Google Data API?
How to pull photo list from Picasa web Album with Google Data API?
How to upload image in Picasa Web Album with Google Data API?
How to create new Picasa Web Album with Google Data API?
How to use Picasa Web Album with Google Data API – Part 3?
How to use Picasa Web Album with Google Data API?
How to get Started with Google Data API aka GData?

Thanks for reading these post.

How to download images from Picasa web Album with Google Data API?

To continue our learning towards Google Data API; this post will show us how we can download images from Google Data API.

To start with, I have designed following .NET GUI interface. We have two list view and and two button control on the form. List view 1 will fetch all album details stored in our Picasa web account. After selecting a particular web album from list view 1 control`; all the images stored in that particular web album will be shown in the list view 2.

I am importing following Google Data API namespace in the form.

using Google.GData.Client; 
using Google.GData.Photos; 
using Google.GData.Extensions; 
using Google.GData.Extensions.Location; 
using Google.Picasa; 
using System.IO;

We have define string variable `myAlbumID`at form level

public partial class Form4 : Form
{
String myAlbumID;

//Code to follow


}

The .NET code snippet on "Get Album List" button is following:

private void button1_Click(object sender, EventArgs e) 
 { 
 listView1.Columns.Add("Album ID"); 
 listView1.Columns.Add("Album Title"); 
 listView1.Columns.Add("No Of Photo"); 
 listView1.FullRowSelect = true; 
 
 PicasaService myPicasa = new PicasaService("Vikash-Test-Picasa"); 
 myPicasa.setUserCredentials("abc@gmail.com", "abcpassword"); 
 AlbumQuery myAlbumQuery = new AlbumQuery(PicasaQuery.CreatePicasaUri("abc")); 
 PicasaFeed myPicasaFeed=myPicasa.Query(myAlbumQuery); 
 foreach (PicasaEntry p in myPicasaFeed.Entries) 
 { 
 
 AlbumAccessor myAlbum = new AlbumAccessor(p); 
 listView1.Items.Add((new ListViewItem(new string[] { myAlbum.Id.ToString(),myAlbum.AlbumTitle.ToString(), myAlbum.NumPhotos.ToString()}))); 
 } 
 }

The .NET code snippet on "List view 1 select index change event" is following:

private void listView1_SelectedIndexChanged(object sender, EventArgs e) 
 { 
 
 myAlbumID = ""; 
 listView2.Clear(); 
 ListView.SelectedListViewItemCollection AlbumList =listView1.SelectedItems; 

 foreach (ListViewItem item in AlbumList) 
 { 
  myAlbumID=item.SubItems[0].Text.ToString(); 

 } 

 if (myAlbumID.Length > 0) 
 { 
  listView2.Columns.Add("Photo Title"); 
  listView2.Columns.Add("Photo Summary"); 
  listView2.Columns.Add("Published Date"); 
  listView2.Columns.Add("Last Updated"); 
  listView2.FullRowSelect = true; 

  PicasaService myPicasa = new PicasaService("Vikash-Test-Picasa"); 
  myPicasa.setUserCredentials("abc@gmail.com", "abcpassword"); 

  PhotoQuery myPhotoQuery = new PhotoQuery(PicasaQuery.CreatePicasaUri("abc", myAlbumID)); 

  PicasaFeed myPicasaFeed = myPicasa.Query(myPhotoQuery); 
  foreach (PicasaEntry p in myPicasaFeed.Entries) 
  { 
  listView2.Items.Add(new ListViewItem(new string[] { p.Title.Text, p.Summary.Text, p.Published.ToShortDateString(), p.Updated.Date.ToShortDateString() })); 
  } 
 } 
 }

The .NET code snippet on "Dowload All Images" button is following:

private void button2_Click(object sender, EventArgs e)
  {
  PicasaService myPicasa = new PicasaService("Vikash-Test-Picasa");
  myPicasa.setUserCredentials("abc@gmail.com", "abcpassword");

  PhotoQuery myPhotoQuery = new PhotoQuery(PicasaQuery.CreatePicasaUri("abc", myAlbumID));

  PicasaFeed myPicasaFeed = myPicasa.Query(myPhotoQuery);
  foreach (PicasaEntry p in myPicasaFeed.Entries)
  {
   
  Stream mystream=myPicasa.Query(new Uri(p.Content.Src.ToString()));
  Bitmap m = new Bitmap(mystream);
  m.Save("C:\\006.  Temp\\PicasaImage\\" +p.Title.Text);

  }

  System.Windows.Forms.MessageBox.Show("All Images have been downloaded");
  }

After setting up the code; I run the form and click on Get Album List button. It fetches all the album details stored in my picasa web account. I clicked on album `Google is the Best`and all images stored in that album were shown in the list view 2.

The next thing I did was to click on button “Download All Images”; the code runs successfully and downloaded all the images to C:\006. Tem\PicasaImage folder in my local system. After all images were downloaded the code pop-up a messagebox stating that All Images have been downloaded.

I checked my folder C:\006. Tem\PicasaImage and all imags were successfully downloaded.

So our objective to download images from Picasa web album has been achieved.

Thanks for reading till this point.

If you want to explore more with the Source code of this post; please visit Download Zone.

Tuesday, May 22, 2012

How to pull Album ID from Picasa Web Album with Google Data API?

This post is next in our series to learn Google Data API. We have externally access Picasa web Albums with Google Data API. We have learnt creating new web Album, uploading single and multiple images to Picasa web album.

AlbumID is one important property of Picasa web album. Each web album has a AlbumID which is used to identify Album. When we are externally accessing the web album we need to pass on AlbumID to identify which album we want to access. In this post we will learn how we can pull AlbumID for each of the web album stored in our Picasa web account.

In my last post we navigated to Picasa web album and clicked on RSS link to fetch AlbumID. We can pull the AlbumID with the help of Google Data API. To start with I have designed following GUI interface in .NET. I have a list view and button control. When user will click on "Get Album List"; the album details including AlbumID will be pulled from Picasa. The album details will be shown in our list view.

I am importing following Google Data API namespaces in the form.

using Google.GData.Client;
using Google.GData.Photos;
using Google.GData.Extensions;
using Google.GData.Extensions.Location;
using Google.Picasa;

The .NET code snippet on the Get Album List button is following:

private void button1_Click(object sender, EventArgs e)
  {
//Adding columns in listview control
 listView1.Columns.Add("Album ID");
 listView1.Columns.Add("Album Title");
 listView1.Columns.Add("No Of Photo");
  
 PicasaService myPicasa = new PicasaService("Vikash-Test-Picasa");
 myPicasa.setUserCredentials("abc@gmail.com", "abcpassword");
 AlbumQuery myAlbumQuery = new AlbumQuery(PicasaQuery.CreatePicasaUri("abc"));
 PicasaFeed myPicasaFeed=myPicasa.Query(myAlbumQuery);
 foreach (PicasaEntry p in myPicasaFeed.Entries)
 {
   
 AlbumAccessor myAlbum = new AlbumAccessor(p);
 listView1.Items.Add((new ListViewItem(new string[] { myAlbum.Id.ToString(),myAlbum.AlbumTitle.ToString(), myAlbum.NumPhotos.ToString()})));
 }
  }

As you can see from the code we are creating the AlbumQuery and passing it to PicasFeed class. We are reading the Album ID, Album title and No of Photo stored in each Picasa web album.

After setting up the code, I run the form and clicked on "Get Album List" button. The code runs successfully and pulled the Album ID, Album title and No of Photo stored in each Picasa web album.

So we can pull the AlbumID of each album programmatically with Google Data API.

Thanks for reading till this point.

If you want to explore more with the Source code of this post; please visit Download Zone.

Sunday, May 20, 2012

How to upload multiple images to Picasa Web Album with Google Data API?

This post is next in series of our learning of Google Data API library. We have learnt quite a few things about Google Data API and how to externally access Picasa web album.

We have learn how to upload single image to Picasa Web Album. In this post we will learn how we can upload multiple image to Picasa web album. We will upload the images to our recently created Picasa web album "Google is the Best". We created this album in our post How to create new Picasa Web Album with Google Data API – Part 4?

I have designed following interface to upload multiple images to Picasa Web Album. We have a OpenFileDialog control on this form. Clicking on Browse button will launch the Open File Dialog box and we will select multiple image. The selected images will be added in the list view control. After clicking on Upload All Images button; the .NET code will upload all images to our Picasa web Album.

I am importing following Google Data API namespace in this program under each post.

using Google.GData.Client;
using Google.GData.Photos;
using Google.GData.Extensions;
using Google.GData.Extensions.Location;
using Google.Picasa;

The .NET code snippet on "Browse" button is following:

private void button1_Click(object sender, EventArgs e)
    {
        openFileDialog1.Multiselect = true;
        openFileDialog1.ShowDialog();
        foreach(string myfile in openFileDialog1.FileNames)
        {
            listView1.Items.Add(new ListViewItem(myfile));
        }
}

The .NET code snippet on "Upload All Images button is following:

private void button2_Click(object sender, EventArgs e)
    {
//Create new Picasa Service
        PicasaService myPicasa = new PicasaService("Vikash-Test-Picasa");
        myPicasa.setUserCredentials("abc@gmail.com", "abcpassword");

//Create new URI by passing userid and AlbumID
        Uri newURI = new Uri(PicasaQuery.CreatePicasaUri("abc", "5737335314773942337"));

//Upload all images to Picasa
        foreach(ListViewItem photoFile in listView1.Items)
        {
    System.IO.FileInfo newFile = new System.IO.FileInfo(photoFile.Text);
    System.IO.FileStream neFStream = newFile.OpenRead();
    PicasaEntry newEntry = (PicasaEntry)myPicasa.Insert(newURI, neFStream, "Image/jpeg", "Test");
    neFStream.Close();
    }
    System.Windows.Forms.MessageBox.Show("All Image has been uploaded");
}

After setting up the code; I run the form and click on Browse button. It open the Open File Dialog box. I have selected four images from my local machine folder.

I have added the selected images in the list view control. So we have total four images in the list that we are going to upload.

The next thing I did was to click on Upload All Images button. The code run successfully and uploaded all the images to our Picasa Web Album "Google is the Best".

I log into my Picasa web account and check the web album Google is the Best. The four images which I uploaded through .NET interface were right up there.

So our objective to upload multiple images have been achived.

Thanks! For reading till this point.

Saturday, May 19, 2012

How to delete image from Picasa Web Album with Google Data API?

This post is next in series of our learning of Google Data API library. We have learnt using Google Data API to externally access Picasa Web Album.

In this post we will learn how we can delete photo from a Picasa web album. We will use Google Data API and .NET code to delete photo from our recently created Picasa web album "Google is the Best".

To extend our example in our previous post; I have added a button control in our .NET interface "Delete Photo". The objective is that the list view will show the photo list from the web album and you can select any image from the list and click on Delete Photo button to remove it from the web album. We are using the same web album that we created in this series

I am importing following Google Data API namespace in this program under each post.

using Google.GData.Client;
using Google.GData.Photos;
using Google.GData.Extensions;
using Google.GData.Extensions.Location;
using Google.Picasa;


The .NET code snippet on "Get Photo List" button is following:

private void button1_Click(object sender, EventArgs e)
{
        listView1.Columns.Add("Photo Title");
        listView1.Columns.Add("Photo Summary");
        listView1.Columns.Add("Published Date");
        listView1.Columns.Add("Last Updated");
        listView1.FullRowSelect = true;

//Create new Picasa service
        PicasaService myPicasa = new PicasaService("Vikash-Test-Picasa");

//Passing user credentials to Picasa service
        myPicasa.setUserCredentials("abc@gmail.com", "abcpassword");

//Creating a new photo query by passing userid and albumid
        PhotoQuery myPhotoQuery = new PhotoQuery(PicasaQuery.CreatePicasaUri("abc", "5737335314773942337"));

//passing photoquery to picasa feed.
        PicasaFeed myPicasaFeed = myPicasa.Query(myPhotoQuery);
        foreach (PicasaEntry p in myPicasaFeed.Entries)
        {
            listView1.Items.Add(new ListViewItem(new string[] { p.Title.Text, p.Summary.Text, p.Published.ToShortDateString(), p.Updated.Date.ToShortDateString() }));
        }
}

The .NET code snippet on "Delete Photo" button is following:

private void button2_Click(object sender, EventArgs e)
{
//Create new Picasa service
        PicasaService myPicasa = new PicasaService("Vikash-Test-Picasa");
        myPicasa.setUserCredentials("abc@gmail.com", "abcpassword");

//Create a photoquery by passing userid and albumid
        PhotoQuery myPhotoQuery = new PhotoQuery(PicasaQuery.CreatePicasaUri("abc", "5737335314773942337"));
        PicasaFeed myPicasaFeed = myPicasa.Query(myPhotoQuery);
        foreach (PicasaEntry p in myPicasaFeed.Entries)
        {
        if(p.Title.Text.Equals(listView1.SelectedItems[0].Text))
        {
            p.Delete();
            System.Windows.Forms.MessageBox.Show("Image Deleted Successfully");
        }
}
}

After deleting the image a message box will prompt stating that "Image Deleted Successfully".

I run the form and clicked on "Get Photo List" button and code runs successfully and it fetched all the images from Picasa web album "Google is the Best"

I selected one image "PicasaTest4.jpg" and clicked on "Delete Photo" button. The code runs successfully and deleted the image from Picasa web album.

I clicked on "Get Photo List" again and this time it shows only four images as it has deleted one image. If you look at the second image in this post we had earlier five images in the web album.

I went to the Picasa web account to verify this and sure enough "PicasTest4.jpg" image was deleted successfully.

So we have learnt how to delete images from a particular web album.

Thanks for reading till this point.

Popular Posts

Real Time Web Analytics