Monday, May 20, 2013

SSIS: How to run specific task of SSIS package programmatically from windows/web application?

SSIS Packages can be run using many platforms. In a business environment SSIS packages can be run from SQL Server agent or using DTEXEC/DTEXECUI utilities. The packages can also be run from web and windows applications. Generally we run the SSIS package from first task to last task. Some time the business logic is such we want to run the selected task from SSIS package. In some situations we try to run the package task if a particular condition has been meet. For example we want to ensure the source files are available before Data Flow Task try to extract, transform and load the data.

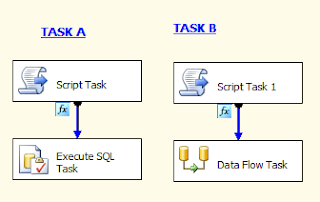
In this post we will learn how we can run the selected/specific task of SSIS package using Windows/Web applications. For the demonstration purpose we will create two tasks in the SSIS package. We will let the user select and run either of the tasks from a windows application. The tasks are Task A and Task B in our SSIS package. Task A truncate all the data from our table. Task B is a Data Flow Task which loads the data from a flat file to SQL table.

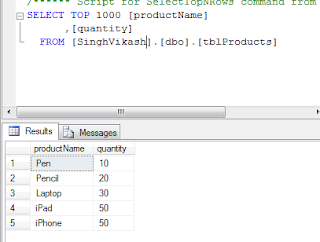
So let us start with our table creation. We have following table named "tblProducts" in SQL Server.

CREATE TABLE [dbo].[tblProducts](
    [productName] [varchar](100) NULL,
    [quantity] [int] NULL
) ON [PRIMARY]

Let us move to BIDS and create a SSIS package. I have defined a variable called strTask of string data type. This purpose of this variable is it will hold the task name which SSIS package has to run.

I have designed two tasks as shown in the picture below. I have added a Script Task in each of the tasks in the SSIS package. The reason is we want to put Precedence Constraint Expression which will be evaluated at the run time. The expression will see what values our variable strTask holds. If it holds the Task A name only Task A will be run.

In the Execute SQL Task I have written the TRUNCATE statement to delete all the rows from table tblProducts.

In the Data Flow Task I am reading all the data from a flat file and loading it into SQL table.

After designing the SSIS package I move to design windows applications interface. In the windows applications I have designed following interface. I have a list view which will show the task names. User will select the task name from list view and click on Run Task button. The SSIS package execution result will be show in the SSIS Task Result label.

I have added Microsoft.SQLServer.ManagedDTS Dll reference in the project. The code snippet on the windows applications is following:

using System;
using System.Collections.Generic;
using System.ComponentModel;
using System.Data;
using System.Drawing;
using System.Linq;
using System.Text;
using System.Windows.Forms;
using Microsoft.SqlServer.Dts.Runtime;

namespace WindowsFormsApplication2
{
    public partial class Form1 : Form
    {
        public Form1()
        {
            
            InitializeComponent();
            listView1.Items.Add(new ListViewItem("Task A"));
            listView1.Items.Add(new ListViewItem("Task B"));
        }

        private void button1_Click(object sender, EventArgs e)
        {

            /* This code logic will run the specific task from SSIS package*/
            string strpackageName;
            string strTaskName;
            strTaskName=listView1.SelectedItems[0].Text.ToString();
            Microsoft.SqlServer.Dts.Runtime.Package SSISpkg;
            Microsoft.SqlServer.Dts.Runtime.Application Myapp;
            Microsoft.SqlServer.Dts.Runtime.DTSExecResult dtresult;
         
            strpackageName = @"D:\Learn_SSIS\ExcelSSIS\ExcelSSIS\Package2.dtsx";
            Myapp = new Microsoft.SqlServer.Dts.Runtime.Application();
            SSISpkg = Myapp.LoadPackage(strpackageName, null);
            Microsoft.SqlServer.Dts.Runtime.Variables AllVariabesType = SSISpkg.Variables;
            
            AllVariabesType["strTask"].Value = strTaskName;
            dtresult = SSISpkg.Execute(null,AllVariabesType,null,null,null);
            label3.Text = "Result for SSIS Pacage Execution is " + dtresult.ToString();
             
        }
    }
}

After setting up the code and user interface for windows applications I run the applications and selected Task A and clicked on Run Task button.

The result for package execution was success.

I checked the SQL table and there was no data. So all rows were deleted from the table because we run only Task A.

Next, I selected the Task B from the list and click on Run Task. This time again the package execution result was Success.

I checked the tblProducts and all the data from flat file were loaded into SQL table.

So this is how we can run the selected or specific task of a SSIS package from windows applications. The same logic can be applied to a web application.

Thanks for reading till this point.

Tuesday, May 14, 2013

SSIS: How to Loop through multiple files and move them in different folders?

SSIS is a great tool to extract and transform data . In a business environment there could be multiple sources of data. The data supplied could be in different format and in different files. In a situation you are dealing with multiple files and want to move each type of file in a designated folder before extracting data from them SSIS helps you to achieve this. In this post we will learn how we can deal with this situation.

Let us consider a business scenario where you are receiving data from multiple vendors and each one send them in a different file. Some vendors send their data in a text file while others prefer to send it in Excel and some in CSV files. Before you process the data you have received a good practice is to segregate the files in different folders so that it becomes easy to handle them.

Considering this scenario we have follwing files(screenshot) available and each one of them contains data. We have some Text files, some Ms-Excel 2003 files, some CSV files and some Excel 2007 files. Let us say each one of our vendor stores the data in this locaiton.

We want to move each file in their respective folder. We have created a Text Files folder where we will move all the text files. A Excel file folder where we will move all the excel files. We have a CSV Files folder where we will move all the CSV files.

We want to achieve this solution through SSIS. I launched the SSIS Designer and created one SSIS package to do this. I followed the following steps during the design.

Step 1: I created four Package level variables. The purpose of thes variables to to store the folder destination location for Text, Excel and CSV files.

Step 2: I have created one Foreach Loop Container task and one Script Task on Control Flow tab.

Step 3: On the Foreach Loop Editor box I have selected Foreach File Enumerator and selected the folder location where all files are stored by vendors. From the Retrieve file name I checked the Fully Qualified name

Step 4: From the Variable Mappings options on Foreach Loop Editor I have mapped the strSourceFile variable which we created in step 1.

Step 5: After setting up the properties and configuration for Foreach Loop I moved to Script task. From the Script task editor box I selected all the variables which I created in step 1 in ReadOnlyVariables

I have added following code snippet in the Script Task. For the simplicity purpose I have removed the error handing and other codes generated by BIDS.

/*
   Microsoft SQL Server Integration Services Script Task
   Write scripts using Microsoft Visual C# 2008.
   The ScriptMain is the entry point class of the script.
*/

using System;
using System.Data;
using Microsoft.SqlServer.Dts.Runtime;
using System.Windows.Forms;
using System.IO;

namespace ST_17e0465156064890a89659496279971d.csproj
{
    [System.AddIn.AddIn("ScriptMain", Version = "1.0", Publisher = "", Description = "")]
    public partial class ScriptMain : Microsoft.SqlServer.Dts.Tasks.ScriptTask.VSTARTScriptObjectModelBase
    {

        public void Main()
        {
            if(System.IO.Path.GetExtension(Dts.Variables["strSourceFile"].Value.ToString())==".xls") 
            {
                System.IO.File.Move(Dts.Variables["strSourceFile"].Value.ToString(), Dts.Variables["strExcelDest"].Value.ToString() + System.IO.Path.GetFileName(Dts.Variables["strSourceFile"].Value.ToString()));
            }
            else if (System.IO.Path.GetExtension(Dts.Variables["strSourceFile"].Value.ToString()) == ".xlsx")
            {
                System.IO.File.Move(Dts.Variables["strSourceFile"].Value.ToString(), Dts.Variables["strExcelDest"].Value.ToString() + System.IO.Path.GetFileName(Dts.Variables["strSourceFile"].Value.ToString()));
            }
            else if (System.IO.Path.GetExtension(Dts.Variables["strSourceFile"].Value.ToString()) == ".txt")
            {
                System.IO.File.Move(Dts.Variables["strSourceFile"].Value.ToString(), Dts.Variables["strTXTDest"].Value.ToString() + System.IO.Path.GetFileName(Dts.Variables["strSourceFile"].Value.ToString()));
            }
            else if (System.IO.Path.GetExtension(Dts.Variables["strSourceFile"].Value.ToString()) == ".csv")
            {
                System.IO.File.Move(Dts.Variables["strSourceFile"].Value.ToString(), Dts.Variables["strCSVDest"].Value.ToString() + System.IO.Path.GetFileName(Dts.Variables["strSourceFile"].Value.ToString()));
            }
            Dts.TaskResult = (int)ScriptResults.Success;
        }
    }
}

After setting up the task in SSIS I run it and SSIS package runs successfully and it moved all the files in their respective location.

This is not the only solution to solve business situations like this but you can try this and extend this solution as per your need. You can check the folders existence before moving the files and if folders are not there you can create them as well.

Saturday, May 11, 2013

PEGA Tutorial
How to setup PEGA PRPC system in your machine?

This article is next in series of our learning PEGA PRPC System. In this post we will learn how we can setup PEGA PRPC Exercise System on our desktop or laptop for learning purpose.

If you are new to the PEGA PRPC system it is recommended that you download the Exercise System to learn the bits and pieces of PRPC components and workflow system. To download a copy of exercise system you need to first visit PEGA Academy and register for a course. The course offered by PEGA academy is not free and one needs to pay for the course. Once you are enrolled into one of the course, PEGA academy let you download the exercise system.

To successfully run the PEGA PRPC system you need following components available to your local machine.

Once you have downloaded the Exercise System you need to install it on your desktop or laptop. The Exercise System is a standalone application which bundles into it all the required components such as operating system (Ubuntu), database (DB2), and web server to successfully run the PRPC system. It creates a Virtual Machine in your desktop. This article will show you all the steps that one needs to perform to install PEGA PRPC system.

The first step involves downloading the Exercise system. I have downloaded the required application which is a single application file. When you click on the Applications it extracts the files to your local machine. PEGA PRPC recommends that you keep 15 GB space to run the PEGA PRPC system on your machine.

Once the applications has extracted all the files you can see that it has extracted two folders “application” and “Server” and a text file named “pvs_release_note”.

The second step involves running the VMware_64bit_check applications from applications folder which basically checks your system compatibility to see if it can run the PEGA PRPC system on not.

The third step involves running the VMware-player-4.0.2-591240 application file from applications folder which basically installs a virtual machine in your local machine. This VM machine has all the required components to run PEGA PRPC system.

Once the VMware Player setup is complete you can navigate to Start->Program Files->VMWare to launch the PEGA PRPC system.

To login to PRPC system you need to provide login id and password which is shown in the VMware player screen. Once you are successfully login into the system, you need to open Internet Explorer and visit to http://prpc:8080 and you will be presented with the PEGA PRPC login screen.

You can login to PEGA PRPC system using any of the credentials which is supplied to you by PEGA PRPC installation guide.

So you are all set to learn and experiment with PEGA PRPC Exercise System.

Please visit PEGA Tutorials section for articles on PEGA and PRPC

Popular Posts

Real Time Web Analytics