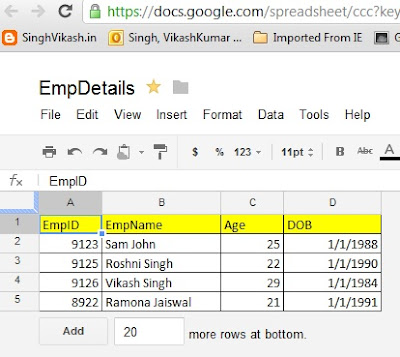
To continue our example we had uploaded EmpDetails Spreadsheet in our very first post to Google Docs. This spreadsheet has four columns and five rows into it. We will add some blank rows and columns in this spreadsheet using our .NET interface.

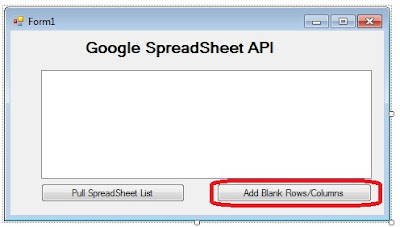
To start with, I have following controls on my .NET form. There are two buttons and one listview control. The button "Pull Spreadsheet List" will read all the available Spreadsheets available in my Google Doc account and add it into Listview1 control. For button "Add Blank rows/Columns" the concept is after clicking on this button the .NET code logic will interact with the selected spreadsheet and add blank rows and columns into it.

using Google.GData;
using Google.GData.Client;
using Google.GData.Extensions;
using Google.GData.Spreadsheets;
We need a form level variable so we declared it at form level.
public partial class Form1 : Form
    {
        string spreadsheetName;
The .NET code logic on the "Pull Spreadsheet List" button is following. The code will pull the spreadsheet list from Google Doc.
private void button1_Click(object sender, EventArgs e)
  {
   listView1.Columns.Add("SpreadSheet Name");
   listView1.Columns.Add("Summary");
   listView1.Columns.Add("Published Date");
   listView1.FullRowSelect = true;

   SpreadsheetsService GoogleExcelService;
   GoogleExcelService = new SpreadsheetsService("Spreadsheet-Vikash-Test-App");
   GoogleExcelService.setUserCredentials("gmailuserid", "Gmailpassword");

   SpreadsheetQuery query = new SpreadsheetQuery();
   SpreadsheetFeed myFeed = GoogleExcelService.Query(query);

   foreach (SpreadsheetEntry mySpread in myFeed.Entries)
   {
    listView1.Items.Add(new ListViewItem(new string[] { mySpread.Title.Text, mySpread.Summary.Text, mySpread.Updated.ToShortDateString() }));

   }

  }
I have following .NET code logic on Listview1 SelectedIndexChanged event to store the Spreadsheet name the user has selected.
private void listView1_SelectedIndexChanged(object sender, EventArgs e)
 {
  spreadsheetName = "";
  ListView.SelectedListViewItemCollection SpreadsheetList = listView1.SelectedItems;

  foreach (ListViewItem item in SpreadsheetList)
  {
  spreadsheetName = item.SubItems[0].Text.ToString();

  }
}
The code logic for button "Add Blank rows/Columns" is following. We are adding 10 rows and 8 columns into the spreadsheet.
private void button2_Click(object sender, EventArgs e)
  {
   if (spreadsheetName.Length > 0)
   {
    SpreadsheetsService GoogleExcelService;
    GoogleExcelService = new SpreadsheetsService("Spreadsheet-Vikash-Test-App");
    GoogleExcelService.setUserCredentials("gmailuserid", "Gmailpassword");

    SpreadsheetQuery query = new SpreadsheetQuery();
    SpreadsheetFeed myFeed = GoogleExcelService.Query(query);

    foreach (SpreadsheetEntry mySpread in myFeed.Entries)
    {
     if (mySpread.Title.Text == spreadsheetName)
     {
      WorksheetFeed wfeed = mySpread.Worksheets;
      foreach (WorksheetEntry wsheet in wfeed.Entries)
      {
       //Add Blank rows and columns
       wsheet.Rows = 10;
       wsheet.Cols = 8;
       wsheet.Update();

      }
     }

    }
    System.Windows.Forms.MessageBox.Show("Rows and Columns Added Successfully");

   }
  }
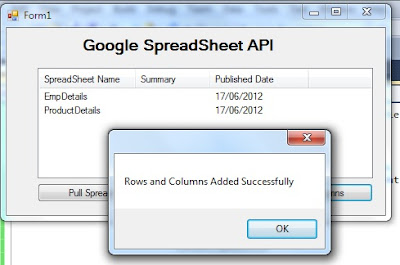
After setting up the code, I connected to internet and run the form. The first thing I did was to click on Pull Spreadsheet list. The code logic on this button pulled all the spreadsheet available to my Google Doc. The next thing I did was to select EmpDetails Spreadsheet and click on button Add Blank rows/Columns. The code logic runs successfully and pop-up the message that Blank rows and columns have been added successfully.

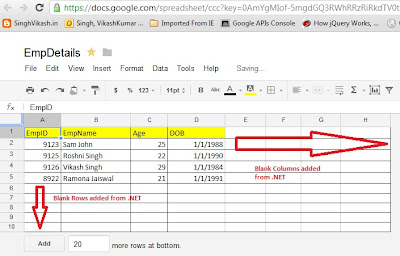
I log into my Google Doc account to verify this and blank rows and columns were added successfully.

So our objective to add blank rows and columns was achived.
Thanks for reading till this point.


